Thursday, September 20, 2012

Demobilizing the garden

It's that time of year - we've had a few hard frosts and if you haven't rescued your veggies from the garden, you're running out of time!  Here in Smithers, the growing season is pretty short, and despite having said it every year for the past 3 years, I have no yet rebuilt my greenhouse.  So I have to rely on crops that will put out under the normal outdoor growing conditions in my area.  This year, the growing season was surprisingly hot here, but it was still too short for my liking.

Today I want to share some recipes for things to do with the stuff from your garden, particularly where it comes to saving them for later.

Zucchini

I could actually use a bit of help with zucchini this year.  I'm overwhelmed with it at the moment, and I already have 6 loaves of zucchini bread in the freezer!  Is there anything else to do but make more zucchini bread?  Here's my favorite recipe from Our Best Bites

Chocolate Zucchini Bread {makes 2 loaves} 

Recipe by Our Best Bites
  • 2 c. flour
  • 2 tsp cinnamon
  • 1/2 tsp salt
  • 1 1/2 tsp baking soda
  • 6 tbsp unsweetened cocoa powder
  • 1/2 c canola oil
  • 1 c sugar
  • 1/4 c brown sugar
  • 3 eggs
  • 2 tsp vanilla
  • 1/2 c sour cream
  • 3 c grated zucchini
  • 3/4 c mini chocolate chips (I just use regular ones)
  • optional: zest from one orange
Topping:
  • 2 T brown sugar
  • 2 T white sugar
  • 1/2 t cinnamon
Preheat oven to 350 degrees. Butter and flour 2 loaf pans and set aside. For the record, this recipe fits perfectly into one 8" and one 9" loaf pan.
Mix topping ingredients in a small bowl and set aside.

Place flour, cinnamon, baking soda, salt, and cocoa powder in a small bowl and whisk to combine. Set aside.

With a stand or hand mixer beat oil, white sugar, brown sugar, and eggs until combined and slightly fluffy, 1-2 minutes. Add vanilla and sour cream and mix until combined. Gently stir in the grated zucchini (and zest if you’re using).

Take a spoonful of the flour mixture and stir in with the chocolate chips, then mix the remaining flour mixture in with the wet ingredients. Stir just until combined. Add chocolate chips and stir to combine. Divide the batter between the two pans. and sprinkle topping over each. Bake in your preheated 350 degree oven for 50-60 minutes

Pumpkin Zucchini Loaf (with chocolate chips, which are not mentioned in the original recipe but which I feel are entirely necessary for any loaf... *urp*)

  • 3 eggs, lightly beaten
  • 2 cups sugar
  • 1 cup canned pumpkin
  • 1 cup butter or margarine, melted
  • 1 tablespoon vanilla extract
  • 3 cups all-purpose flour
  • 1 teaspoon baking soda
  • 1/2 teaspoon baking powder
  • 1/2 teaspoon salt
  • 1/2 teaspoon ground cinnamon
  • 1/2 teaspoon ground nutmeg
  • 1/2 teaspoon ground cloves
  • 1 cup shredded zucchini
  • 1 cup chopped walnuts (or chocolate chips, if you're like me)
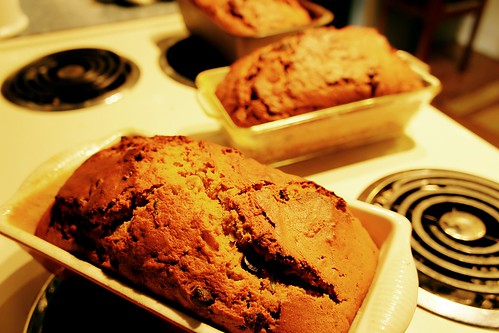
In a mixing bowl, combine eggs and sugar. Add pumpkin, butter and vanilla. Combine dry ingredients; gradually add to pumpkin mixture and mix well. Stir in zucchini and nuts. Pour into two greased and floured 9-in. x 5-in. x 3-in. loaf pans. Bake at 350 degrees F for 45-50 minutes or until breads test done. Cool in pans 10 minutes. Remove to a wire rack. 


Beets

We loooove pickled beets!  We eat them all the time in winter, and you can use the brine in lieu of vinegar for interesting salad dressings. My go-to recipe for pickling beets is this one: Canned, spiced pickled beets

You can also use the beet greens - just steam or saute them like you would spinach, and serve with a bit of butter.

Don't want to pickle all of your beets?  Beets last for a looooong time in the fridge, so you can probably keep them in there for at least a month after you pick them.  Try roasting them with other root vegetables for a fantastic side dish: Roasted beets n' Sweets

Potatoes

I always get a fair ton of potatoes from the garden - a different variety each year.  Two years ago, I went with Russian blue (purple potatoes!), last year with red, and this year I tried Yukon gold. They've all been pretty fabulous, but these Yukon gold are so moist and juicy!  Delicious!

I keep most of our potatoes in the crawl space in the cardboard box raised off the dirt.  That keeps them cool and dry, and I just bring enough up for a few meals at a time.  We often roast potatoes with the Easy Roast Chicken, but I'm a sucker for mashed potatoes... even more so at Christmas, when my mom makes then "special".

Special Mashed Potatoes

Peel and boil enough potatoes for about 10 people.  Once you've drained them, add 1 cup of sour cream, half a cup of cream cheese, and a head of roasted garlic cloves (squeezed from the skin).  Mash together with a bit of salt and pepper, adding butter and milk if it's really lumpy.  Then put the whole mess in a casserole and pop in the oven at 350F for about 20 minutes until the edges start to brown a little.  Better smashed taters you will never taste!

Tomatoes

I really thought with the warm weather we had this summer that this would be the year that my tomatoes ripened.  Alas, last Saturday morning I woke up to the first hard frost of the season and had to go running outside to rescue 10 more pounds of green tomatoes.  Thankfully, there are wonderful things you can do with green tomatoes. One of our favorites is this green tomato chutney, which is fantastic on pork chops and sausages.  Every year that I make it, I fail to write down the exact recipe or where I found it.  But this is basically what I do:

Green Tomato Chutney

  • 2 1/2 pounds firm green tomatoes, about 6 cups diced
  • 1 cup golden raisins
  • 1 cup chopped onion
  • 1 1/2 cups light brown sugar, firmly packed
  • 1 teaspoon salt
  • 1 1/4 cups cider vinegar
  • 1 teaspoon chili powder
Trim the tomatoes and dice them up into smallish pieces. Add cider vinegar to a large pot over medium-high heat, and add the brown sugar, stirring until it dissolves.  Add the remaining ingredients and bring to a boil. Reduce the heat and simmer for 1 hour until the tomatoes and onions are soft and the mixture is thickened. Spoon the chutney into hot, sterilized jars, leaving 1/4" headspace. Add lids and process in a water bath canner for 15 to 25 minutes, depending on your altitude (I use 20 minutes for Smithers). If any jars do not seal, use them immediately.

Green Sauce

Another great green tomato recipe is the green sauce that I make to go with Tacos de Lengua.  Click the link for the full taco recipe (fantastic recipe too, btw). This recipe isn't really boonies-friendly, but if you have access to the more unusual ingredients I'd highly recommend it as a substitute for regular guacamole.
  • 2 tomatillos
  • 2 green tomatoes
  • 1 jalapeno (1/2 seeded)
  • 2 garlic cloves
  • 2 avocados
  • juice of 1 lime
  • cilantro
  • salt
Coarsely chop tomatillos, green tomatoes, garlic & jalapeno & saute over medium heat until soft.

Halve & scoop out the avocados & puree in a mixer. Add softened vegetables, 1/2 a bunch of cilantro, juice of 1 lime and salt and puree until smooth. Put in a bowl to cool.

Kohlrabi

This is actually my first year for growing kohlrabi in the garden, but I can tell you it won't be my last.  Kohlrabi looks a bit like a turnip, tastes a bit like broccoli, and grows like crazy in my garden. I've been told that I should have harvested it when the bulbs were about 2" in diameter, but I've been harvesting big bulbs and just trimming off the hardened root and some of the skin.  So far, I've only eaten it raw, sliced and sprinkled with a little bit of salt, but I'm excited to try the following recipe from Farmgirl Fare.

Kohlrabi Puree

  • 4 kohlrabi bulbs with leaves
  • 2 Tablespoons extra-virgin olive oil
  • 1 large onion, chopped
  • 3 cloves garlic, minced
  • 1 cup chopped mushrooms
  • 3 tbsp cream (or milk, chicken stock, olive oil, or water)
  • Salt and pepper to taste 

Rinse the leaves (discarding any that are yellow) pat them dry, and coarsely chop. Set aside. Trim the kohlrabi bulbs, peeling them if the skins seem tough. Cut the bulbs into 1-inch chunks.

Bring a saucepan of lightly salted water to a boil, and add the kohlrabi chunks. Reduce the heat and simmer until tender, about 15 minutes.
Meanwhile, heat the olive oil in a skillet. Add the onion and sauté over medium-low heat until softened, about 5 minutes. Add the garlic and cook, stirring, another 1 to 2 minutes. Don't let the garlic brown.  
Add the mushrooms and the reserved kohlrabi leaves to the skillet. Cover, and cook 5 minutes. Then uncover, and cook, stirring, until all the liquid has evaporated, 3 minutes. Set the skillet aside.  
Drain the kohlrabi chunks and place them in the bowl of a food processor. Add the mushroom mixture and the cream (or whatever substitute you're using). Purée until smooth. Salt and pepper to taste.  Transfer the purée to a saucepan and reheat over low heat, stirring, 2 minutes. Serve warm.


And those are just a few of the things that I'm rescuing from my garden this week!  Hope that you've also had some gardening success, and if you haven't started a garden yet... why not try?


Thursday, August 2, 2012

it's fish season!

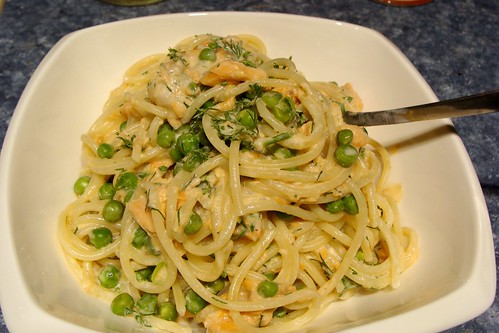
Here in northern British Columbia, August is smack in the middle of salmon season, and let me tell you - I'm going to take advantage!  This recipe uses jarred fish (which tastes about a million times better than canned fish, but if you don't jar your own fish you'll have to make do with the canned stuff), as well as yogurt, a lemon, and a few fresh herbs.  It's summer, so hopefully even the boonies cook can grow a couple of herbs in a pot at this time of year! 

The bonus for this recipe is that it literally takes 8 minutes to make.  In the time that it takes to boil pasta, you can be feeding your entire family.  Because who wants to spend hours in the kitchen when it's so nice out??  not me.

I don't want to say I invented this recipe, but I saw a recipe in a magazine at the doctor's office, then tried to reproduce it at home.  I have no idea if it's the same...

Pasta with Salmon, Yogurt, and Dill


Ingredients
  • 4 servings pasta (spaghetti works well)
  • 1 c. frozen peas
  • 1-2 jars (or cans) of salmon (preferably sockeye), drained
  • 1 c. plain yogurt (not Greek)
  • 1 tbsp grated lemon rind
  • 2 cloves garlic, minced
  • 1/4 c. fresh dill, chopped
  • 1/4 c. fresh parsley, chopped
  • salt and pepper to taste
Instructions:

Boil water and add pasta.  During the last 3 minutes of the pasta cooking, add the frozen peas.

While the water is boiling, mix the yogurt, lemon rind, garlic and herbs together in a bowl.

Drain the pasta and peas.  Add the yogurt mixture and the salmon and mix.

Serve and OMNOMNOM.

Monday, June 18, 2012

Rainforest burritos

OK, I've been wanting to post this recipe since I started this blog and I finally got my cousin's permission to post it... as long as I change the name.  So, I hereby give you *drum roll*... the rainforest burrito!  Rainforests have nothing to do with the burrito, but it's kind of in keeping with what her family calls them. This recipe came from my cousin, who got it from her dad, who may or may not have gotten it from a restaurant somewhere.

This recipe is soooooo yummy! I'm not even an olive fan, but I couldn't dream of these burritos without them! For the boonies cook, it's reasonably attainable (the tomato is the only thing that won't keep for a long time in the fridge), and it's really fast to put together. 

For this recipe, you'll need:
  • 1 lb ground beef
  • 2-3 cloves of garlic, minced
  • 1/2 c. sliced or chopped almonds (preferably toasted)
  • 1 apple, chopped
  • 1/2 c. raisins
  • 1/2 c. sliced green olives
  • 1 tomato, chopped
  • 1/4 tsp. ground cinnamon
  • 1/8 tsp. ground cloves
  • flour tortillas
  • feta cheese
  • sour cream
  • salsa
  • lettuce
To make, brown the meat in a large frying pan or wok. Drain excess fat.
Now, add each ingredient in order up to the spices, stirring for about a minute after each addition. 

Heat some flour tortillas - you can do this one by one in a dry frying pan over medium heat.  Don't cook them - you just want them to soften.  Alternatively, you could place them in the microwave for about 20 seconds on high. Or in the oven wrapped in foil for about 15 minutes at 350°F.

Add a leaf of lettuce, then put the meat mix on it. Sprinkle some feta cheese, sour cream and salsa over the whole mess and wrap up to eat. You'll probably need to make this every night for a week because it's so dang good.

Monday, June 4, 2012

Spring rhubarb

Here in the Bulkley Valley, spring has sprung and my rhubarb patch is hastily producing some tangy red stalks to tempt me. One of my fondest memories growing up was sitting on the back steps at my house with a giant stalk of rhubarb and a little yogurt container of sugar. My friends and I would raid the rhubarb patch and dip the stalks in sugar, munching them down during the heat of the day in the shade of the house. The moment I discovered the rhubarb patch the first spring in my new house, I was elated!

Rhubarb is a great local food - easy to grow (seriously, I've never known a rhubarb patch to need maintenance of any kind).  In fact, I'm often completely baffled by the people who try to sell it at the farmers market or Safeway.  Doesn't everyone have a rhubarb patch??

So if you have a rhubarb patch, start raiding it.  Here are some great recipes to make use of that spring treasure!


Rhubarb Currant Chutney

This recipe comes from Epicurious and is wonderful on grilled pork chops, tenderloin or sausages. I'm pretty sure you could easily can this and have it for the whole year too.
  • 3/4 cup (packed) dark brown sugar
  • 1/3 cup apple cider vinegar
  • 2 tablespoons water
  • 1 tablespoon minced peeled fresh ginger
  • 1 1/2 teaspoons grated lemon peel
  • 1 cinnamon stick
  • 2 cups 1/2-inch pieces fresh rhubarb
  • 1/2 cup dried currants
Bring the first 6 ingredients to a boil in a saucepan, stirring until the sugar dissolves. Reduce heat and simmer for 5 minutes. Add the rhubarb and currants and simmer until the rhubarb softens. Serve warm with your choice of meat.

Dal with Rhubarb

This vegetarian recipe comes from Mark Bittman (of How to Cook Everything fame). It's super fast and very, very boonies friendly due to the use of dried staples and seasonal ingredients. In addition, it's vegetarian so you can help save the world just a little bit. I love it, but it's very gingery and tangy so hubby isn't a fan.  However, if you're like me and love a lot of flavour in your food, give this a go!

  • 1 cup dried red lentils, washed and picked over
  • 2 tablespoons minced fresh ginger
  • 1 tablespoon minced garlic
  • 4 cardamom pods
  • 1 tablespoon mustard seeds
  • 2 cloves
  • 1 teaspoon cracked black pepper
  • 1 dried ancho or other mild dried chile (optional)
  • salt
  • 2 tablespoons cold butter or peanut oil (optional)
  • chopped fresh cilantro leaves, for garnish
Combine all of the ingredients except the salt, butter and cilantro in a saucepan and add water to cover it by about 1 inch. Bring to a boil, then lower the heat so the mixture simmers gently. Cook, stirring occasionally for 25 to 30 minutes, or until the lentils are tender. Remove the cloves and cardamom pods, and add the salt, butter and cilantro. Serve on its own, or with steamed rice or quinoa.
In case you haven't had enough rhubarb, here's a whole slideshow of delicious rhubarb recipes from Epicurious!

Saturday, May 26, 2012

Read the labels

Hi folks,

Sorry for the long leave of absence.  I was out of town, then feeling lazy... but hubby and I are back on the healthy bandwagon, working out, running, and getting the diet back in order. So I thought that instead of a recipe today, I would talk a bit about tricky food labeling.

I was caught by tricky food labeling just yesterday. You see, I've been on a big Greek yogurt kick lately. Greek yogurt is high in protein, low in fat, and extra thick and creamy. We've been buying this brand here:


It's fantastic! Comes in handy single servings for work, a few yummy flavors (honey and lime are my favorites, hubby prefers berry flavors), and comes in a non-fat version too.  Here's the nutritional info:


Note in particular the amount of fat - this is in the regular version, so going non-fat isn't even all that different. 

Problem is, everyone and their dog seems to be on this Greek yogurt kick too, and it sells out in minutes in the local Safeway. So I was home on Vancouver Island last week, and my mom introduced me to a new Greek yogurt:

Note that it says "Greek Style" yogurt. This is important.
Because when I came home and bought a tub yesterday, I ate a few bowlfuls, then read the label:

 Holy guacamole Batman!  66% of my daily saturated fat in a bowl of yogurt?  This stuff is dessert, not breakfast! 

So here's my warning.  Beware of any labels that include the word "style", because it sure as heck isn't authentic.  I'll give the Krema yogurt props for being totally delicious, but with that much fat it damn well should be! 

Ditto with the word "drink" in place of "juice". Juice is liquid squeezed from a fruit. "Drink" is sugar water that may or may not include some form of fruit-based liquid, along with sugar, sugar, more sugar, and sugar.

Have a wonderful weekend!  I'm off to feed some pigs :)


Wednesday, April 25, 2012

Portable, Good-For-You Porridge

I am NOT a morning person.  Nuh-uh. My goal in life is to wake up as late as possible and still get to work on time.  So it follows that breakfast is not high on my list of weekday morning priorities.  Sometimes toast, most often nothing at all.  I usually just take a lot of snacks to work, and work through them as the day progresses. But once in a while I remember that I can bring a decent breakfast to work with minimal preparation. Instant oatmeal is an option, but I find most of the brands to be sickeningly sweet. So here is a version of instant oatmeal that you can make yourself - you could even prep several of these on the weekend and leave them in your cupboard to grab on the go.

You'll need a small jar with a lid (a 250 mL canning jar works great), some rolled oats, and whatever dry toppings you like on your oatmeal.

Fill half the jar with the oats, and sprinkle on spices of your choice (I add cinnamon and ginger and sometimes cardamom). Then add your toppings (dried fruit, nuts, flax seeds, coconut, whatever). Now close the jar.

When you get to work, dump the whole thing in a bowl, and measure out about 3/4 jar of water and add it to the bowl.  Microwave for 3 minutes on high.  If you like, you could bring an individual sized yogurt or cut up fresh fruit for the top. Voila!  Instant breakfast with minimal sugar or preservatives!  WIN.

Thursday, April 19, 2012

Pasta with Tuna and Broccoli

It would appear that posting about my former carb-obsession may have opened the floodgates to more pasta recipes.  Certainly, they've been a go-to thing over the past couple of weeks.  I mean, who has time to cook when there's playoff hockey to be watched? 

So in that vein, I'll present you with another easy and fast pasta recipe that puts most of your favorite food groups in a single bowl. My dad found this recipe several years ago - possibly in Canadian Living Magazine.  You may think it to be a weird combination of flavours, but it works - it really does. And for the boonies cook, it's pretty achievable.  The broccoli can be fresh or frozen, and everything else is canned or dried.

Start by breaking apart a head or two of broccoli and putting the florets in a steamer. Put the water on to boil for the pasta, and put the broccoli on to steam (about 5 minutes once it starts to boil - you want it to retain a bit of crispness).

Mince 3 cloves of garlic and saute them in 2 tbsp. olive oil in a large frying pan until fragrant but not brown. 

Add 2 cans of flaked tuna (drained) to the garlic and stir around. Then add 1 tbsp dried basil (or about 1/4 c. chopped fresh if you have it), and a few shakes of crushed red chili pepper (to taste).

Put about 3/4 c of raisins in a coffee mug.  At this point, your broccoli should be done, so drain the broccoli water directly into the coffee mug to blanch the raisins.  Then add the drained broccoli to the tuna mix and stir. After about a minute, drain the raisins and add those to the broccoli and tuna. 

Toss with the cooked pasta of your choice (I like rotini - it holds on to the tuna better than other pastas), and serve garnished with parmesan cheese. 


Tuna and Broccoli Pasta

2-3 servings of pasta (rotini works well)
1-2 heads broccoli, split into florets
3 cloves garlic, minced
2 tbsp olive oil
2 cans flaked tuna, drained
1 tbsp dried basil
crushed red chili pepper (to taste)
3/4 c. raisins
parmesan cheese